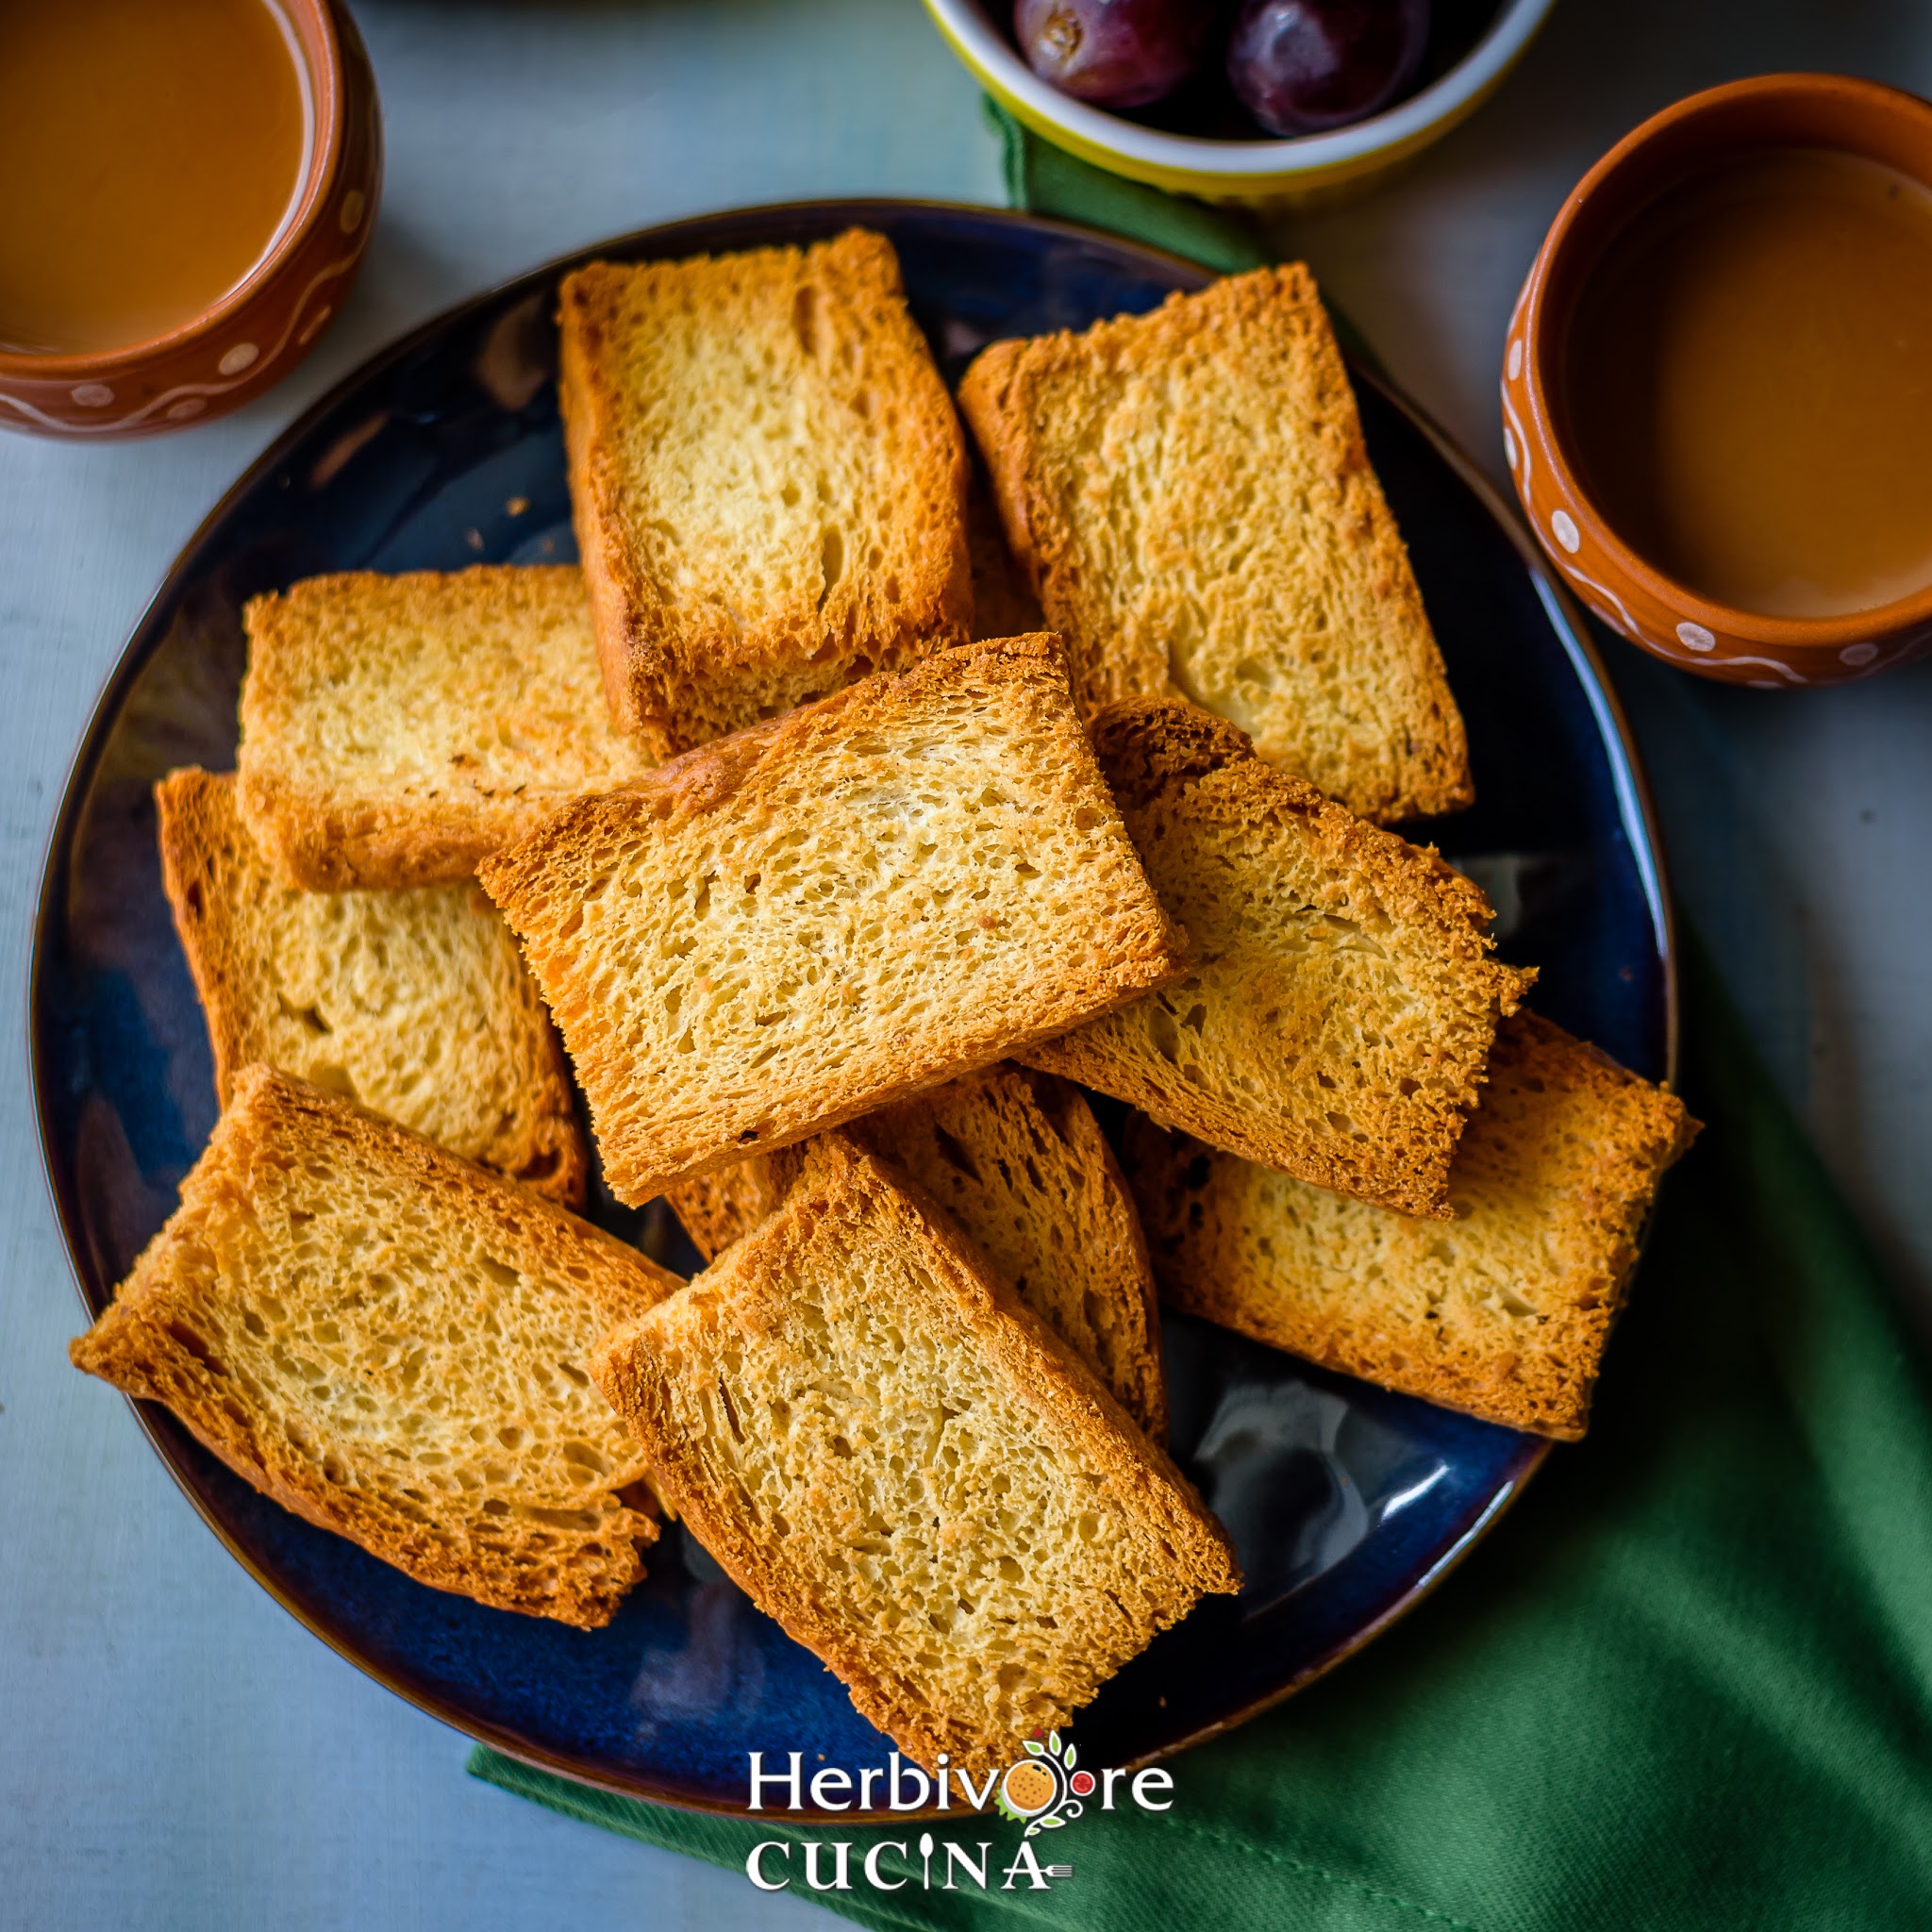
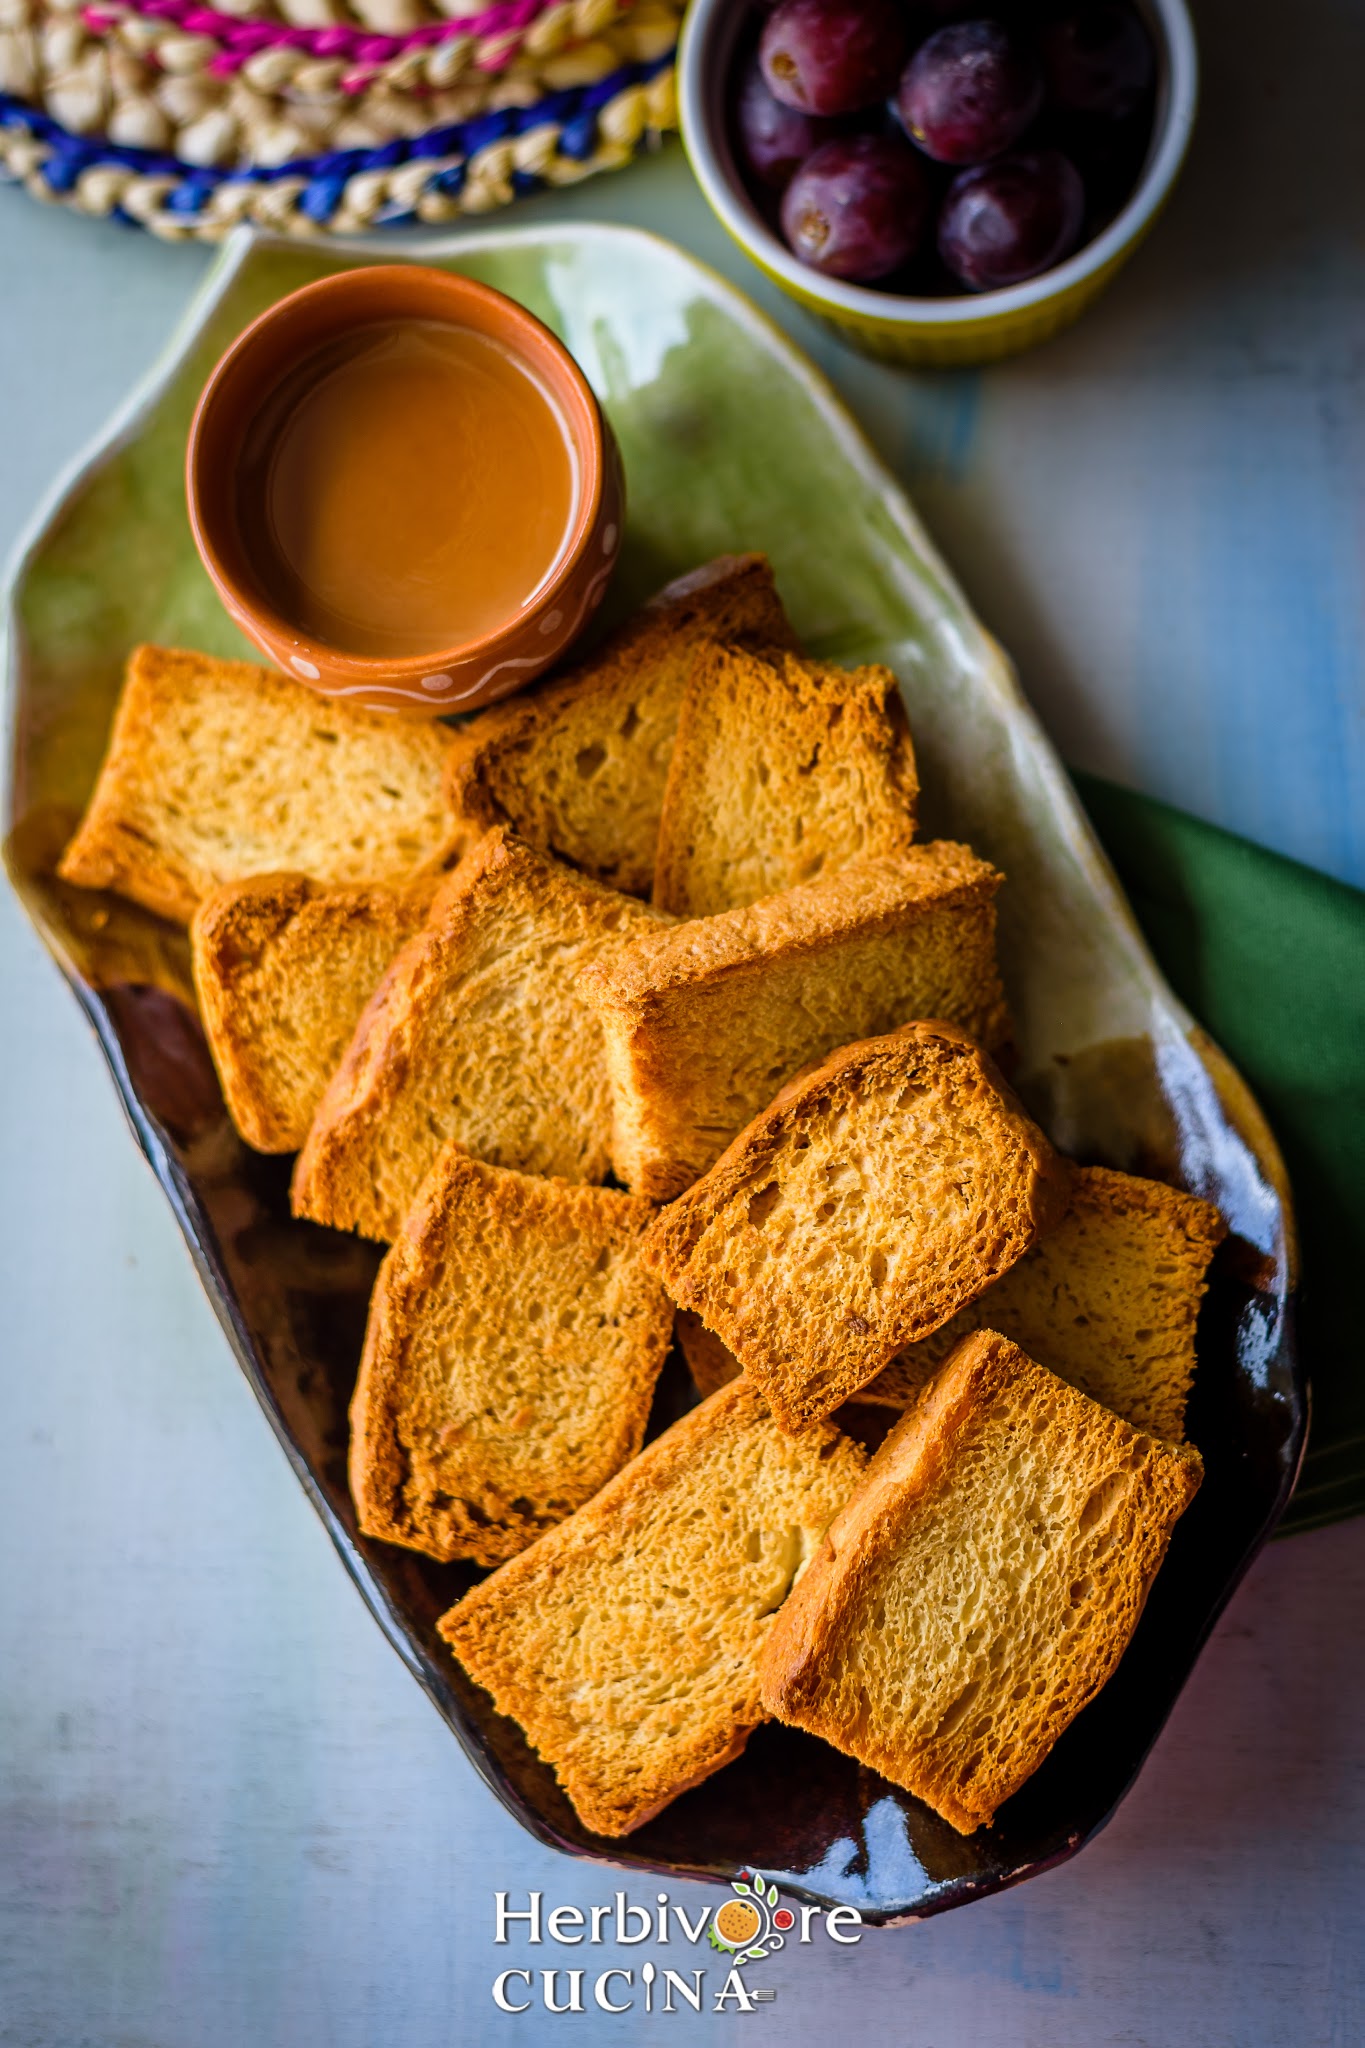
The ultimate twice-baked, crunchy tea-companion designed to soak up milk or chai; Milk Rusk is easy to make and super delicious.
This crowd pleaser recipe is mildly flavored and super customizable!
Jump to:
India has it's own list of favorites. Whether it is the love for a game of cricket, the corner stores that sell a ton of essentials, the roadside eateries and chai stalls or the Chinese food that is sold across the country. These silently unite the country and provide comfort.
Rusk is no different. Twice baked slices of bread that are flavored with different add-ins are just as popular. And these are available in local bakeries, iconic places like Hyderabad's Karachi Bakery and Pune's Kayani Bakery or from modern giants like Parle and Britannia.
In India, if you serve someone a cup of tea without at least two rusks (or biscuits) on the side, it’s considered an incomplete gesture of hospitality! And so, these are enjoyed in bulk everywhere. And when you can bake these milk rusk from scratch, you definitely do!
What is Milk Rusk
The easiest way to describe Milk Rusk is a hard, dry biscuit or a dehydrated bread. It is popular in various countries in different forms. In India, this rusk is popularly known as toast biscuit, rusk or khasta in Hindi.
It starts with baking a bread flavored with whatever spices or add-ins you desire. Then the bread is cooled, sliced and baked till golden brown. Popular at local bakeries and from various brands; this is actually pretty easy to make from scratch.
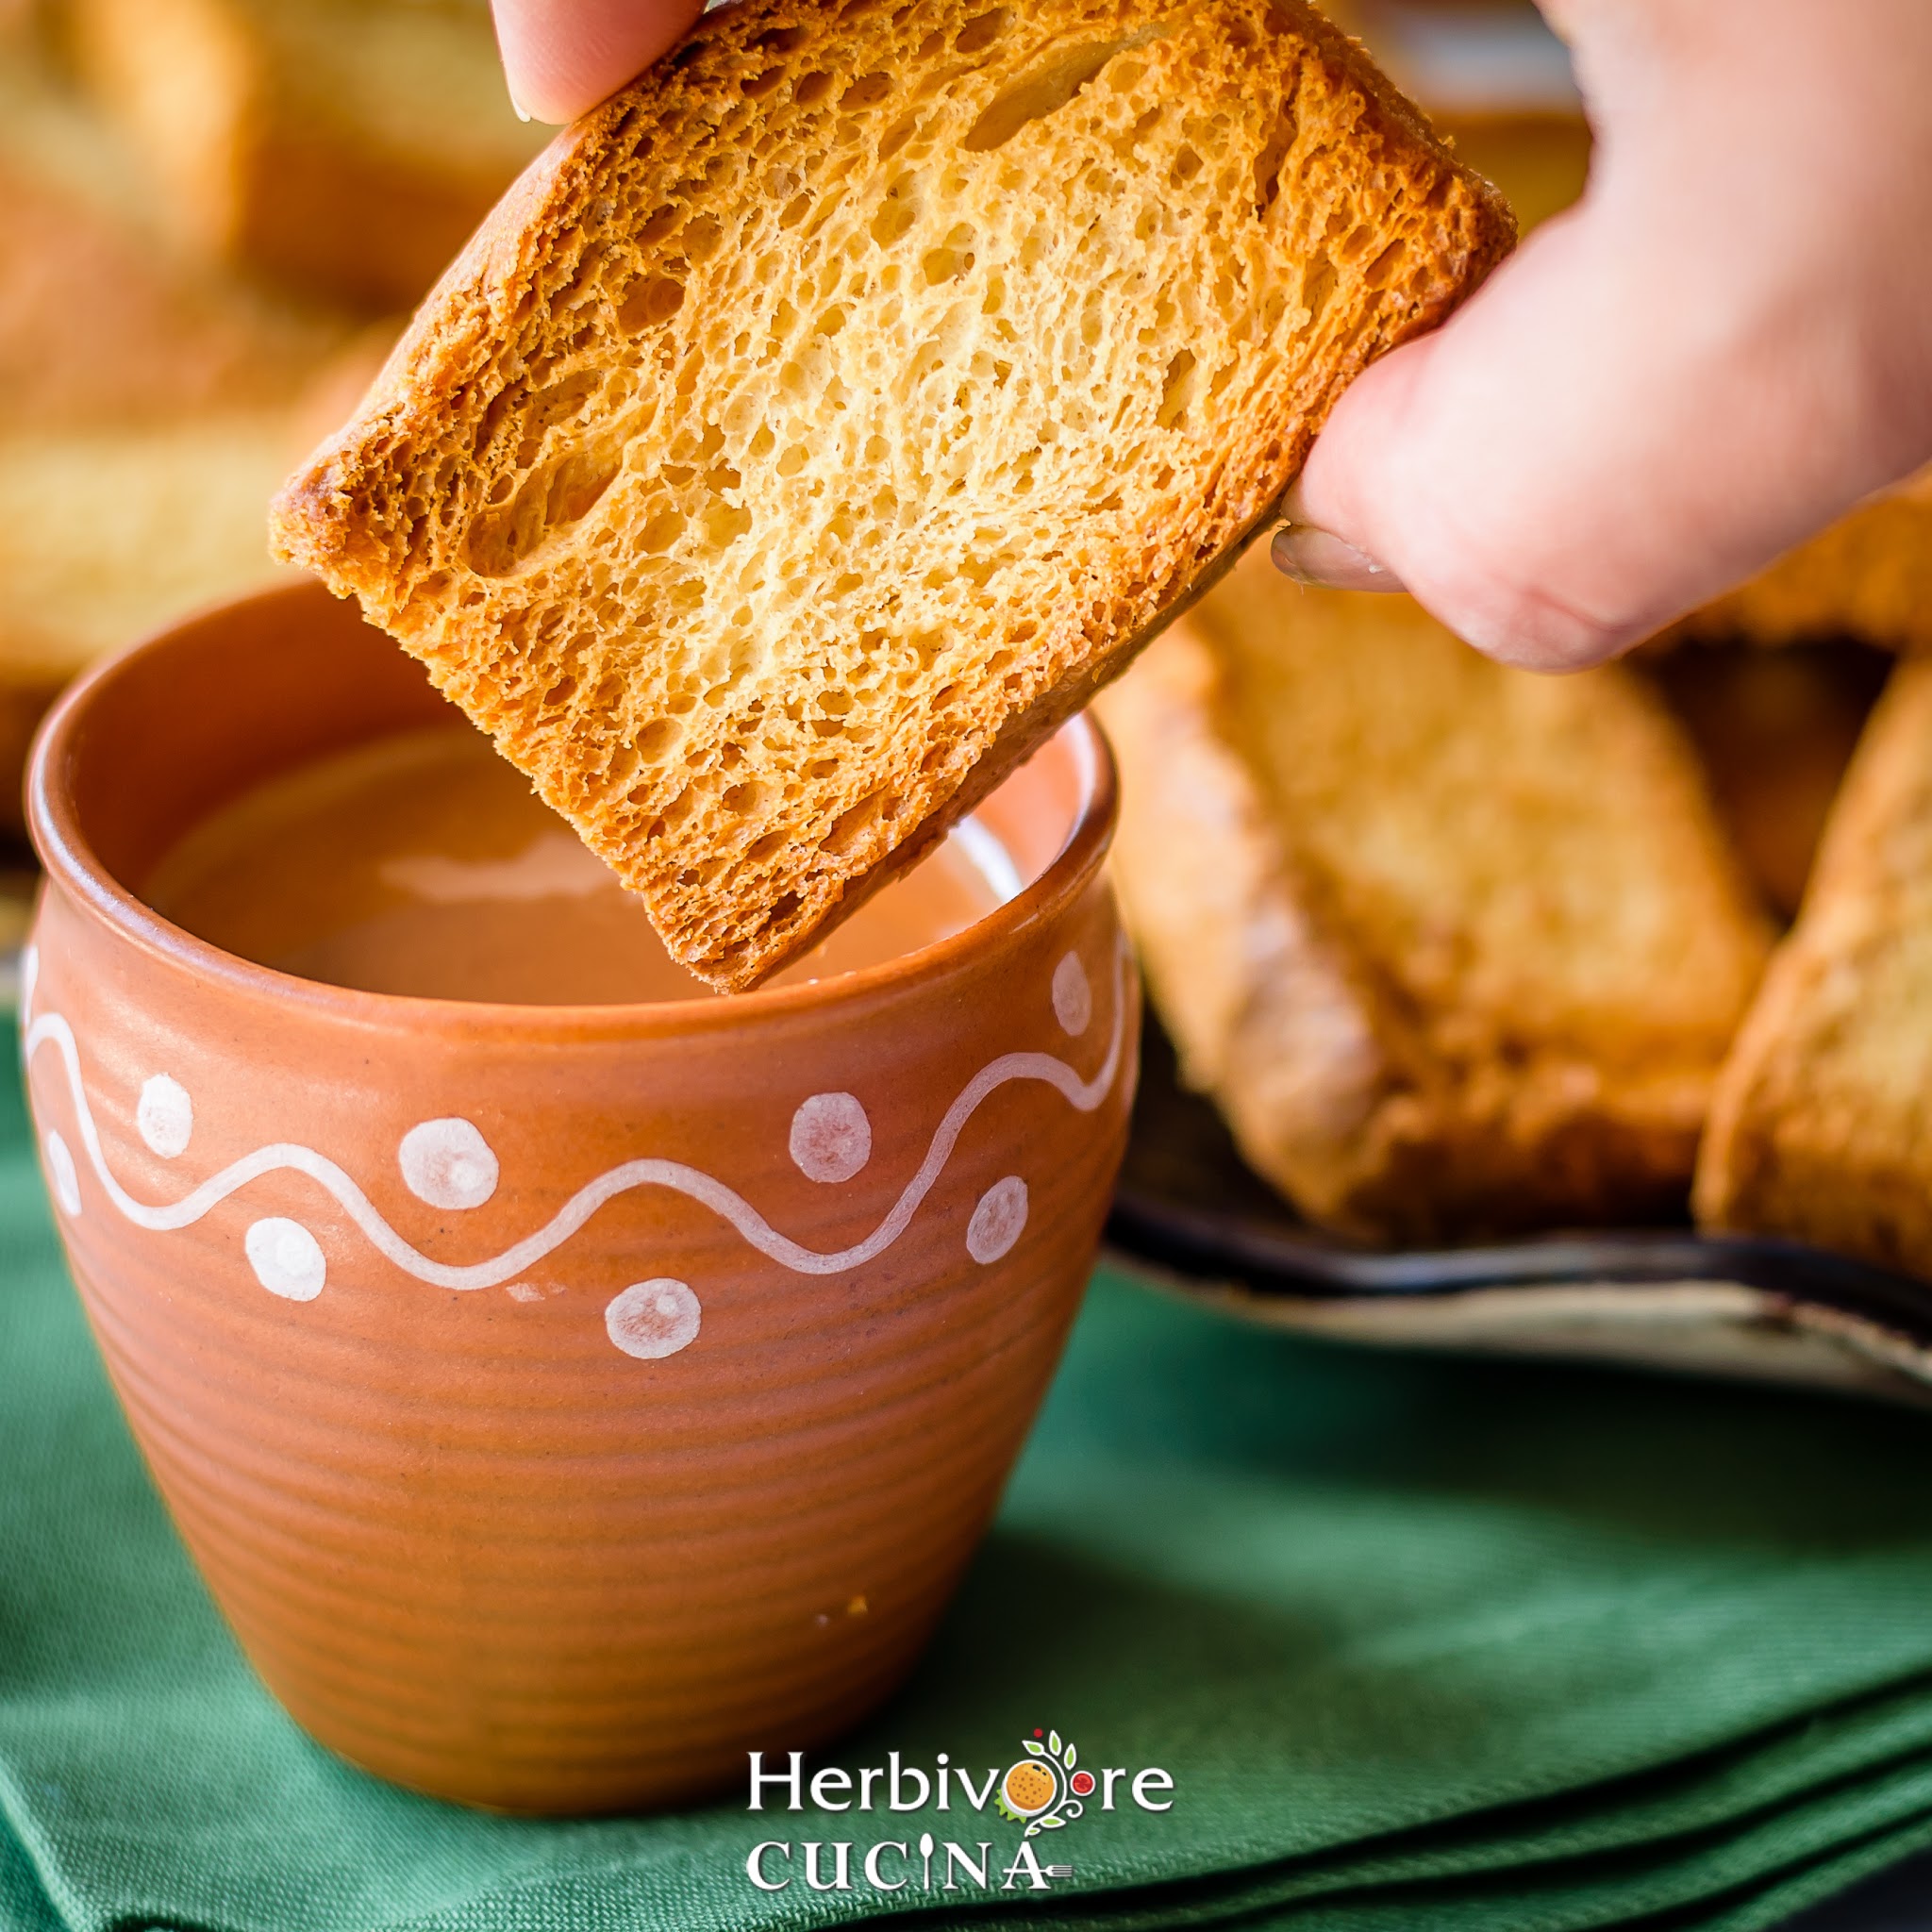
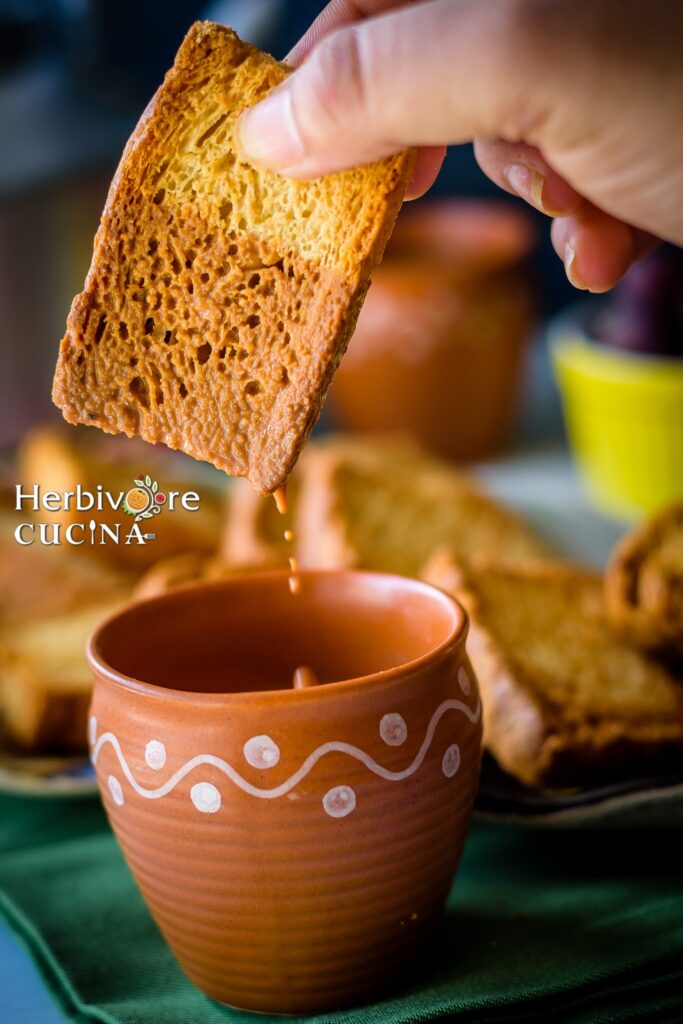
These rusks are extremely crisp, brittle and porous. Designed for soaking up liquids; these are great dipping treats for masala tea or coffee for adults; plain or flavored milk for kids.
Why this recipe works
- It is easy to control what goes into the recipe. We can pick and choose the butter/oil, flour etc.
- Customizing the sweetness in the rusk is easy to achieve at home.
- It is easy to make taste tweaks like adding cardamom, saffron, almonds or nutmeg to the toasts.
- Controlling the amount of baking time helps customize the crunch level from super crunchy to slightly soft.
- These rusk are light; much lighter than a heavy cookie or pastry.
- Milk rusk have a super long shelf life as they are free from any kind of moisture.
- These make the perfect dunking partner for tea, coffee or milk.
- It is easy to make a big batch in just some active time.
Ingredients and Substitutions
- All purpose flour: I have used all purpose flour this to make the bread for rusk. However, it can be made with whole wheat flour and some added gluten too. Moreover, bread flour is an option too.
- Active dry yeast: I have used active dry yeast as the rising agent in the recipe. While both instant and active dry yeast work, I generally stick to active dry for loaf breads, shaped breads and buns. The instant version of yeast works better for focaccia, pizza etc.
- Water: We need liquid in the recipe for activating the yeast and making the bread dough. That is where the water comes in.
- Unsalted Butter: I like to stick to unsalted butter for the recipe. Any neutral oil works too, based on preferences. Just make sure the butter is at room temperature.
- Sugar: I have used just enough sugar to sweeten the bread but not make it like cake. Change it to your liking. Plus, a pinch of sugar activates the yeast.
- Milk Powder: Adding milk powder gives the rusk the perfect flavor and taste as store bought rusk. It helps keep the toast light yet delicious. Using milk instead of some water is an option; but it makes the rusk heavy and denser.
- Cardamom: The flavor of cardamom makes the rusk super amazing. I like to add some cardamom seeds and some powdered cardamom for flavor. Adding other spices and add-ins is an option too.
- Salt: A pinch of salt helps activate the yeast and is great to enhance the sweetness in the toast.
- Vanilla Extract: A perfect flavoring agent for the bread, vanilla extract gives the rusk a floral touch. Replace this with almond extract for a more pronounced almond flavor.
See the recipe card for detailed ingredient information, measurements and nutrition.
How to make this recipe
Making the bread
1- In a bowl 1 cup water, 1 teaspoon sugar and 1 teaspoon salt. Mix well and warm it up till about 105-110 F.
2- Then add the yeast, mix and rest covered in a warm place. The yeast will bloom in about 10 minutes.
3- In a mixing bowl or the base of the stand mixer add the flour, milk powder, remaining sugar and vanilla extract. Mix well.
4- Then add unsalted butter, cardamom seeds, cardamom powder and bloomed yeast.
5- Mix and make a dough adding more warm water if required. Knead it till it is smooth. Then coat with oil or butter and rest covered for an hour in a warm place.
6- Meanwhile, line a 9 inch square pan with parchment paper or non-stick spray.
7- After an hour the dough should have doubled in size.
8- Knead again for 5-7 minutes and roll the dough to a square of 9 inches. Place the dough in the bread pan and cover it. Rest for another hour.
9- When the hour is almost up, preheat oven to 400 F/ 210 C. Once the loaf rises till the top of the pan, place it in the oven.
10-Bake for 15-18 minutes, till the top is golden. Then remove and cool for 10 minutes before transferring to a cooling rack.
Making the Rusk
1- Slice the bread into equal sized slices. I divided the bread into half to get two loaves of 4 ½ inches length. Then I sliced the loaves into ¼ inch slices.
2- Place the slices on a baking tray leaving some space between them.
3- Bake them in an oven preheated to 275 F. Make sure you turn them over every 7-10 minutes to ensure even baking and prevent burning. Continue for about 20 minutes.
4- Then raise the temperature to 300 F and bake for another 30 minutes, flipping twice in between.
5- Remove once the rusk are golden brown. Cool and transfer to an airtight jar.
6- Enjoy with some hot Masala Chai.
Expert Tips and Notes
- Adjust the sweetness: I have used a small amount of sugar to make the rusk slightly sweet. Adjust the sugar to make them more or less sweet. Moreover, omit the added sugar to make sugar-free rusk.
- Change the add-ins: Add some crushed fennel seeds, saffron strands, nutmeg powder or cinnamon for a different flavor profile. Plus, some slivered almonds or tutti frutti give the rusk a different flavor.
- Slice them even: Make sure all the bread slices are evenly sliced. That is key for them to bake evenly and together. Otherwise, bake the thin ones for lesser time and then remove them. Bake the thicker ones for some extra minutes.
- Watch the rusk while they bake: The thinly sliced bread slices go from golden brown to black in a matter of seconds. So keep an eye while these toast.
The 'Dunking' experience
As we know, milk rusk makes a great dunking partner for all kinds of drinks. Here is a quick guide to enjoy a perfect dunk.
- The Dip: Submerge the rusk partially in a cup of hot chai, coffee or milk.
- The Wait: Hold the rusk in for 2-3 seconds. Any longer can disintegrate the rusk in the drink.
- The Reward: This process transforms the dry toast into a delicious melt-in-the mouth treat that has all the flavors of the dipping drink. Enjoy it before it slips between the cup rim and the lips!
Recipe FAQs
Milk rusk is made from enriched wheat flour, yeast, milk powder, water, butter and sugar. Additions in the form of spices or nuts is common.
The main reason for rusk to be dense is if the first baked bread dough is not airy and fluffy. This happens when the yeast is not activated correctly or has expired.
The key points to bake risk perfectly includes slicing them evenly and baking them at low temperatures (275-300 F). Also, do not forget to flip them in between to ensure the moisture evaporates evenly from both sides.
Cake rusk is nothing but twice baked slices of pound cake or slice cake as it is commonly known in India. This has a leavening agent like baking soda along with other ingredients. Milk rusk is on the other hand is twice baked yeast bread.
More Bread Recipes to try
Love this recipe? Please leave a star rating in the recipe card below & if you REALLY like it, consider a review in the comments whilst you are there, thanks!
Milk Rusk
Ingredients
- 3 cups All Purpose Flour
- 1 cup Water
- 2¼ teaspoon Active dry Yeast
- 3 tablespoon Milk Powder
- 1 teaspoon Cardamom Seeds (optional)
- 1 teaspoon Powdered Cardamom (optional)
- 1 teaspoon Salt
- 3 teaspoon Sugar
- 1 teaspoon Vanilla Extract
- 3 tablespoon Unsalted Butter (room temperature)
Instructions
Making the bread
- In a bowl add the water, 1 teaspoon sugar and salt. Mix well and warm it up till about 105-110 F.1 cup Water, 1 teaspoon Salt
- Then add the yeast, mix and rest covered in a warm place. The yeast will bloom in about 10 minutes.2¼ teaspoon Active dry Yeast
- In a mixing bowl or the base of the stand mixer add the flour, milk powder, remaining sugar and vanilla extract. Mix well.3 cups All Purpose Flour , 3 tablespoon Milk Powder, 1 teaspoon Vanilla Extract , 3 teaspoon Sugar
- Then add unsalted butter, cardamom seeds, cardamom powder and bloomed yeast.1 teaspoon Cardamom Seeds, 3 tablespoon Unsalted Butter , 1 teaspoon Powdered Cardamom
- Mix and make a dough adding more warm water if required. Knead it till it is smooth. Then coat with oil or butter and rest covered for an hour in a warm place.
- Meanwhile, line a 9 inch square pan with parchment paper or non-stick spray.
- After an hour the dough should have doubled in size.
- Knead again for 5-7 minutes and roll the dough to a square of 9 inches. Place the dough in the bread pan and cover it. Rest for another hour.
- When the hour is almost up, preheat oven to 400 F/ 210 C. Once the loaf rises till the top of the pan, place it in the oven.
- Bake for 15-18 minutes, till the top is golden. Then remove and cool for 10 minutes before transferring to a cooling rack.
Making the Rusk
- Slice the bread into equal sized slices. I divided the bread into half to get two loaves of 4 ½ inches length. Then I sliced the loaves into ¼ inch slices.
- Place the slices on a baking tray leaving some space between them.
- Bake them in an oven preheated to 275 F. Make sure you turn them over every 7-10 minutes to ensure even baking and prevent burning. Continue for about 20 minutes.
- Then raise the temperature to 300 F and bake for another 30 minutes, flipping twice in between.
- Remove once the rusk are golden brown. Cool and transfer to an airtight jar.
- Enjoy with some hot Masala Chai.
Notes
- Adjust the sweetness: I have used a small amount of sugar to make the rusk slightly sweet. Adjust the sugar to make them more or less sweet. Moreover, omit the added sugar to make sugar-free rusk.
- Change the add-ins: Add some crushed fennel seeds, saffron strands, nutmeg powder or cinnamon for a different flavor profile. Plus, some slivered almonds or tutti frutti give the rusk a different flavor.
- Slice them even: Make sure all the bread slices are evenly sliced. That is key for them to bake evenly and together. Otherwise, bake the thin ones for lesser time and then remove them. Bake the thicker ones for some extra minutes.
- Watch the rusk while they bake: The thinly sliced bread slices go from golden brown to black in a matter of seconds. So keep an eye while these toast.
Nutrition

Rafeeda AR says
They look perfect! And what more than home made, without any preservatives... pinning this up!